Saturday, December 31, 2011
Need your reviews on the earrings below please thank you.....
Hello friends:
Below you will see pictures of my first attempt at bohemian hoop earrings ...I guess I made them a bit colorful and maybe I should of let some of the metal show by not using quite so many beads but live and learn I always say...Would love some imput from all of you. So if you have time leave a comment...I think I will make some different ones using the dangling chain lengths...But it was a hoot making these anyway...So give me your reviews they always help me improve my work...Thank you so much and bye for now
Below you will see pictures of my first attempt at bohemian hoop earrings ...I guess I made them a bit colorful and maybe I should of let some of the metal show by not using quite so many beads but live and learn I always say...Would love some imput from all of you. So if you have time leave a comment...I think I will make some different ones using the dangling chain lengths...But it was a hoot making these anyway...So give me your reviews they always help me improve my work...Thank you so much and bye for now


Thursday, December 29, 2011
Wednesday, December 28, 2011
Tuesday, December 27, 2011
Monday, December 26, 2011
Thursday, December 22, 2011
MY ATTEMPT AT MAKING DRAGONS VEIN POLYMER CLAY BEADS

AS YOU CAN SEE I MISSED THE MARK BIG TIME...WAS TRYING FOR DRAGONS VEIN GEM STONE BEAD LOOK OR SNAKE SKIN. BACK TO THE DRAWING BOARD I GUESS ...I WILL LET YOU KNOW IF I FIGURE THIS OUT..
Saturday, December 17, 2011
Thursday, December 15, 2011
Wednesday, December 14, 2011


THE WIRE GUARDIAN , ONE OF MY FAVORITE FINDINGS
WIRE GUARDIANS GIVE YOUR WIRE THAT ADDED STRENGTH IT NEEDS AND ALSO GIVES YOUR WORK THAT POLISHED, FINISHED, AND PROFESSIONAL LOOK...
After you have strung all the beads on the beading wire and you have them like you want them, you add your crimp bead (I prefer the 2x2mm tube shaped crimps), and insert the wire through one side of the wire guardian. These guards are available in both silver and gold plate and for the piece pictured, I used .015 beading wire.

Saturday, December 10, 2011
top ten ways to use mica powders with polymer clay
Mica powders are very popular with clayers-- one of the top few "extra" materials most of us buy, I'd say. It's no wonder, considering how many things you can do with them and the way that they can turn a ho-hum piece into something shimmering and beautiful.
Top Ten Ways to Use Mica Powders with Polymer Clay:
10. Use it with a stencil.
Place a bought (usually in the paint section of craft stores), found (such as a paper doily), or homemade (cut from cardstock or a thin sheet of plastic) stencil over a piece of clay. (This technique works most easily on flat projects.) Gently tap mica powders (as many as you like) onto the exposed clay. Carefully lift stencil to reveal your pattern.
9. Make a sparkling glaze.
Mix a little mica powder into a small amount of polymer-friendly finish (Future or Varathane) or acrylic medium. (You can mix some in a painter's palette, if you need very little, or use a small paint pot or film canister if you want to make enough to save for another time.) Thin with water to reach desired consistency. Apply over plain or decorated cured polymer clay pieces for an extra touch of sparkle.
8. Crackle it over raw clay.
In order to crackle mica powders, you'll need to mix them into an acrylic medium or polymer-friendly finish. Future Floor Wax works well for this. Mix it (as described above), then paint it onto a sheet of raw polymer clay. Allow the finish to dry, then feed through the pasta machine or roll with a brayer or acrylic rod to produce the crackling effect.
7. Use it in mokume gane.
As described in last week's Top Ten Tuesday, you can use mica powders in mokume gane in a couple of ways. Either apply occasional dabs of it to painted or plain polymer clay sheets, or mix it into Future (etc.) and paint it onto the sheets.
6. Salvage ugly scrap clay.
An unattractive mix of scrap clay (or a color mix gone wrong) can take on a whole new life with an application of mica powder. Just shape the clay and apply the powders before curing. Be aware that certain colors (such as the interference colors) may not completely mask the color of the underlying clay. If in doubt, experiment with a tiny bit of clay and powder.
5. Create faux effects.
Mica powders are useful in a number of faux effects. Metal colors (such as silver or bronze) create an instant appearance of metal. A mix of colors (blue, purple, pink, gold, etc.) "splotchily" blended on black clay imitates the look of raku. Pearl powders make. . . well, pearls. ;o) A touch of these sparkling powders lends a realistic look in a number of faux stone mixes.
4. Tint liquid polymer clay.
Translucent liquid clay can be tinted in a few different ways. Using mica powders as part or all of the colorant gives it a subtle shimmer that's lovely.
3. Tint solid translucent clay.
Translucent clay tinted with mica powders can seem almost to softly glow. Use this mixture "as is" or make a Skinner Blend between two mica-tinted bodies of clay for a ravishing effect.
2. Cover the exterior of a piece.
Using one color or as many as you like, cover an entire piece with mica powders. If you want texture, apply the powder to both the clay and the stamp or texture sheet prior to making the impression. If any portion of the clay remains unpowdered, fill in those spots with the aid of a paintbrush.
1. Highlight textured clay.
For a different look from the "all over sparkle", texture the clay first, then apply mica powders (in however many colors you want) to only the raised portions of the pattern or texture, allowing the clay color to remain visible in the impressions. This can give the appearance of antiqued metal.
Remember: Most mica powders require a coat of polymer-friendly finish (such as Future or Varathane) to prevent the powder from rubbing away-- particularly if the piece will be worn or handled. If you've mixed the powders into Future, Varathane, or another polymer-friendly finish, the extra coat is unneccessary, unless you want more layers for protection or added shine.
Violet Inked Polymer Clay Beads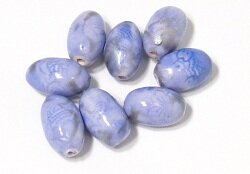 I never really thought of using ink in this way, until I read about it in a forum, and was amazed about the ceramic or porcelain looks of the polymer clay beads I saw there. So I decided to give it a go, and this was the result. What you need to make these beads:
Step 1: Cut thin slices of the white clay and condition it well. Run it through on the thickest setting. Use a shape cutter to cut out slices from the clay sheet. Each slice will become a bead. This way you will get the same size on all the beads. The shape of the cutter doesn't matter. 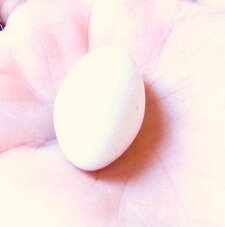 Step 2: Step 2:Roll each slice into an oval bead between your palms. Just roll it with large circles and it will automatically become oval. If the tips get too pointy, just push them into a rounder shape with your fingers. Pierce the bead with a bamboo rod. 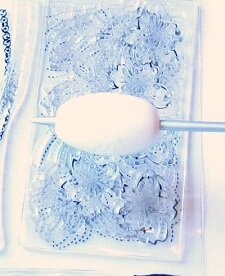 Step 3: Step 3:Prepare your stamp by dusting it with a bit of corn starch. Roll the bead over the stamp. Check that you are content with the pattern. If not, just roll the polymer clay bead in your palms again to remove the pattern, and roll it over the stamp one more time.  Step 4: Step 4:Now, you are going to paint the bead. Put a few drops of the ink in a paint palette. Use a soft brush and apply the ink to the beads. If you want the bead darker, apply one more layer. Preferably the ink shall fill the low parts of the pattern, so that these appear darker than the rest of the bead. The ink dries very quickly, so you have to work fast. Add more ink when needed. Step 5: Bake the beads for 30 minutes and let them cool. If you find that the pattern doesn't seem darker than the surface of the polymer clay bead, you can sand the surface a bit, to make a contrast between the lower and higher parts of the pattern. Step 6: When the beads are cold, they are ready for glazing. In your paint palette, add some liquid polymer clay and two to three drops of ink. Stir it until it is well mixed. Stir carefully so that you avoid air bubbles. Pour liquid clay in another cup in the palette and add silver Mica powder. Add until you have a thicker paste, but still running. Step 7: Use a soft brush and apply the inked polymer clay to the bead. Go over with the brush from bottom to top, to remove potential air bubbles. Check the silhouette of the bead towards a darker background to see if you have removed them all. Use the heat gun and heat the bead until it is satiny. See this tutorial on how to do this if you haven't done this before. Apply two more layers of inked liquid clay. Before you heat the last layer, apply the silver paste with a bamboo rod. This way you can make thin lines or thick splotches, just the way you like. Use the bamboo rod to draw the two colors into each other, creating patterns. When content, heat it with the heat gun like described above. Step 8: Let the beads cool off. Re-heat them if they are not shiny enough. Should the beads feel rubbery after you are finished, you can put them back in the oven for about 20 minutes. Sometimes tubes of clay protrude from the holes of the bead, because of the bamboo rods. Just cut these off with a sharp pair of scissors. And that was it. Your polymer clay beads are now ready for use. You can see them used in a necklace in this tutorial. 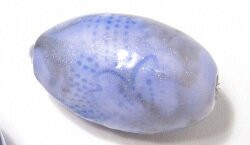 |
Mica Powder And Other Inclusions You Can Use With Polymer Clay
Mica powder and other inclusions can be mixed into polymer clay. In fact Polymer clay is a perfect medium for inclusions of most sorts, which opens up for more experimentation with this lovely, versatile clay.
There are inclusions like mica powder that are made especially for polymer clay, and there inclusions that are made for lots of other things, like food, scrap booking and even gardening. They all can be used to give new dimensions to the art of polymer clay.

Monday, December 5, 2011
How to Make Beaded Foot Jewelry for The Beach

If shoes rank highly as your favorite accessories, you will love these "barefoot sandals". Beaded foot thongs or barefoot sandals are glamorous, sexy adornments, seen on naked feet from the French Riviera to the beaches of St. Kitts. These are REQUIRED accessories for beach weddings. Barefoot sandals are easy and inexpensive to make. Even for the novice crafter, this jewelry can be made in less than an hour. Depending on the beads you select, a pair of these barefoot sandals may cost less than $3. Boutique prices may be thirty times as much. At this price, you can make a pair to go with each of your favorite swimsuits or beach outfits!
- Difficulty:
- Easy
Instructions
Things You'll Need
- medium weight clear elastic beading string
- various beads
- cotton tipped swab, like Q-tip
- superglue
-
- 1
 Clear beading cord ASSEMBLE SUPPLIES:
For this craft project, no special tools are needed. For each barefoot sandal, cut one piece of beading elastic, approximately 30" long. Using the cotton tipped swab, put a little super glue on the ends of the elastic (about 1") to stiffen the ends. This will make it easier to put on beads. Allow to dry thoroughly. This will only take a couple minutes. - 2
 6/0 Seed beads from Firemountain Beads OVERVIEW OF THE STEPS FOR MAKING BAREFOOT SANDALS:
-make toe loop in the center or the beading elastic
-join ends of the elastic and string beads on double strings to make the upper part of the barefoot sandal
-separate the strings to make each side of the anklet
-tie the strings together (They will join at the back of the ankle, just above the heel.) - 3
 Barefoot Jewelry. Sexy accessories for the beach SELECT YOUR BEADS:
See link below for help with selecting colors for making beaded jewelry. Use beads with large enough holes to easily pass your beading elastic through the center. I like to use 6/0 size seed beads. You will find excellent sites for buying beads online in links and associated ads. - 4
 Toe loop for barefoot sandals BEGIN STRINGING YOUR BEADS:
For the simplest beaded foot thong, begin by stringing seed beads onto elastic, about 3" long. Bring the two ends of the elastic together and put both ends through a single bead. Slide the bead to join the string of beads to make a loop. This will be the toe loop for your barefoot sandals. - 5 MAKE THE UPPER PORTION OF THE SANDALS:
Pass both elastic pieces (strings) through the beads you have chosen for the upper portion of the sandals. Depending on your foot size, this will be 3" to 5" long. - 6 FINISH ADDING BEADS:
For the anklet portion of your sandals, separate the strings and begin adding beads to each side. The design should be symmetrical. When you have added enough beads so that the anklet fits snugly, but not too tight, you are done beading. - 7 FINISH MAKING THE SANDALS:
Tie the two ends of the strings to complete the anklet. After tying, thread about and inch of the tag ends of the beading elastic through adjacent beads to the left and right of the knot. Cut off leftover elastic. Put some superglue on the knot and dry thoroughly.
- 1
Read more: How to Make Beaded Foot Jewelry for The Beach | eHow.com http://www.ehow.com/how_5983382_make-beaded-foot-jewelry-beach.html#ixzz1fixQUTXn

Subscribe to:
Posts (Atom)