Subscribe to:
Post Comments (Atom)
skip to main |
skip to sidebar


What a cool way to display your jewelry


Pinterest


Beaded beads are fascinating for so many reasons. It's more of that Zen-like quality of beadweaving for me: imagine making a bead out of beads! Where does one bead stop and the next bead begin?


How to Make Broken China Jewelry -- powered by eHow.com


BY JACQUELINE
HELLO VISITORS
Hello: My name is Jacqueline Marchant. I am a Jewelry designer /creator and book reviewer for some very famous crafting publishing companies. When you check out my book reviews you will learn who they are. In these reviews you will receive loads of information and my feelings about the publication. I have learned an extraodinary amount about all the many facets and mediums in designing and creating jewelry from these books and I am over the moon that I have them to refer to , they have been a god send to me. IN THIS BLOG YOU WILL FIND TONS OF INSTRUCTIONAL VIDEOS I HAVE FOUND IN MY SEARCH FOR KNOWLEDGE,THESE VIDEOS HAVE BEEN GRACIOUSLY SUPPLIED ONLINE FOR US ALL TO LEARN FROM BY SOME VERY TALENTED, BRILLIANT ARTIST. i HAVE LEARNED FROM THESE VARIOUS VIDEOS FROM YOU TUBE AND OTHER PLACES ON THE WORLD WIDE WEB AND PLACE THEM ON MY BLOG SO I CAN READLY REFER TO THEM FROM TIME TO TIME AND I HOPE YOU FIND THEM HELPFUL ALSO, I HOPE TO ONE DAY BE AS BRILLIANT AS THESE VIDEO TEACHERS.To learn more from these various artist just click on title of videos to link to all their other tutorials...thank you ... YOU WILL ALSO SEE SOME PICS OF MY WORK, AND SOME OF MY ADVENTURES. I ALSO LIKE INCLUDING OTHER ARTISANS SITES FOR YOU TO EXPLORE. I FIND THE MORE YOU EXPLORE THE MORE YOU LEARN AND BY DOING THIS YOU GET INSPIRATION TO CREATE YOUR VERY OWN ONE OF A KIND MASTERPIECE. HOPE YOU ENJOY MY BLOG AND COME BACK AGAIN . WHILE HERE PLEASE FEEL FREE TO JOIN MY BLOG.
THANKS SO MUCH FOR STOPPING BY......BYE FOR NOW, JACQUELINE MARCHANT
THANKS SO MUCH FOR STOPPING BY......BYE FOR NOW, JACQUELINE MARCHANT
http://www.last.fm/user/gelfling55/library/recent
Real Time Visitors
Followers
Total Pageviews
Popular Posts
-
(Item # 507) SCARLETT'S BONNIE BLUES earrings by Jacqueline This lovely pair of earrings are made with swarovski crystals and they spa...
-
Hi all my fellow Jewelry/Artisan Bloggers. Well to start with I would like to talk about my amazing partner. Her name is Jelveh Jaferian. ...
-
Hello everyone and welcome to my blog. Come on in sit a spell and have a look around. My name is Jacqueline Marchant but all my fam. and f...
-
JAPANESE BEADWORK with SONOKO NOZUE 25 Jewelry Designs from a Master Artist Published by LARK CRAFTS An Imprint of Sterling Publishing Co...
-
BOOK GIVEAWAY WINNER HAS BEEN CHOSEN GIVE AWAY IS OVER. That's right this book is up for grabs thanks to LARK JEWELRY & BEADING. L...
-
Hello guys and gals. Do you ever get tired of setting up the same ole booth for every show ? Or could it be that this is your first craft ...
Blog Archive
- February (1)
- December (8)
- October (21)
- September (16)
- August (3)
- March (2)
- January (3)
- November (8)
- September (1)
- August (1)
- July (3)
- May (9)
- April (17)
- March (18)
- February (34)
- January (9)
- November (1)
- October (2)
- July (6)
- June (15)
- May (20)
- April (9)
- March (11)
- February (15)
- January (21)
- December (20)
- November (15)
- October (34)
- September (36)
- August (43)
- July (27)
- June (25)
- May (8)
- April (30)
- March (25)
- February (26)
- January (57)
- December (52)
- November (42)
- October (35)
- September (10)
- August (10)
- July (4)
- June (5)
- April (1)
- March (3)
- February (22)
- January (6)
- July (15)
- June (27)
- August (1)
Feedjit
Search This Blog
Facebook Badge
Translate
My Blog List
Google Website Translator Gadget

Bike wheel necklace display

What a cool way to display your jewelry


href="http://freevintagedigistamps.blogspot.com/">

egg carton ring holder


The numbers generated by this widget come from RANDOM.ORG's true random number generator.
Popular Posts
-
(Item # 507) SCARLETT'S BONNIE BLUES earrings by Jacqueline This lovely pair of earrings are made with swarovski crystals and they spa...
-
Hi all my fellow Jewelry/Artisan Bloggers. Well to start with I would like to talk about my amazing partner. Her name is Jelveh Jaferian. ...
-
Hello everyone and welcome to my blog. Come on in sit a spell and have a look around. My name is Jacqueline Marchant but all my fam. and f...
-
JAPANESE BEADWORK with SONOKO NOZUE 25 Jewelry Designs from a Master Artist Published by LARK CRAFTS An Imprint of Sterling Publishing Co...
-
BOOK GIVEAWAY WINNER HAS BEEN CHOSEN GIVE AWAY IS OVER. That's right this book is up for grabs thanks to LARK JEWELRY & BEADING. L...
-
Hello guys and gals. Do you ever get tired of setting up the same ole booth for every show ? Or could it be that this is your first craft ...
ENVIROTEX RESIN AND HARDENER
About Me

- gelfling50
- Kentucky, United States
- Well I am married to a wonderful man. I love designing jewelry. I have been a jewelry artisan for over ten years now. I also have a great love for animals...Right now I have a 16 year old boston terrier and three boxers. I am also starting this blog site with loads of my jewelry designs and tutorials I have come across in my search to learn and improve on my craft. I would love to hear from fellow beaders. Thanks for stopping by......
A Site With A Wealth of Information
Bead & Wire Jewelry Book full of projects
polymer clay dragonfly
I found this picture of an adorable polymer clay dragonfly during one of my browsing sessions ....How talented this person is....check it out...


Powered by Blogger.


http://video.about.com/beadwork/How-to-Install-Coil-Ends-on-Jewelry-Cord.htm
HTML code:

Click to join beadtribe

Click to join beadtribe
Ginger Snap Scraps, along with many other crafting stores
and bloggers have teamed up for a crafters paradise of giveaways!
This giveaway runs now until May 25.
a href="http://www.leelou-blogs.com/" target="_blank">

Bulletin Board ReVamp
Beadphoria: Spring Cleaning Bulletin Board Reduxby Beadphoria |
Happy (almost) Spring, Beadphoria friends! With this being the first Monday of the month, it is time for the Designer Crafts Blog Hop! The theme this month is March, and what it means to you. For me, March means the arrival of spring. A time for renewal. What was once barren is now brought back to life.
With the feeling of being renewed, we often want to bring beauty into our surroundings. One way we can do this is by doing some spring cleaning. This simple project will bring new life to a boring bulletin board and it will help organize your jewelry!
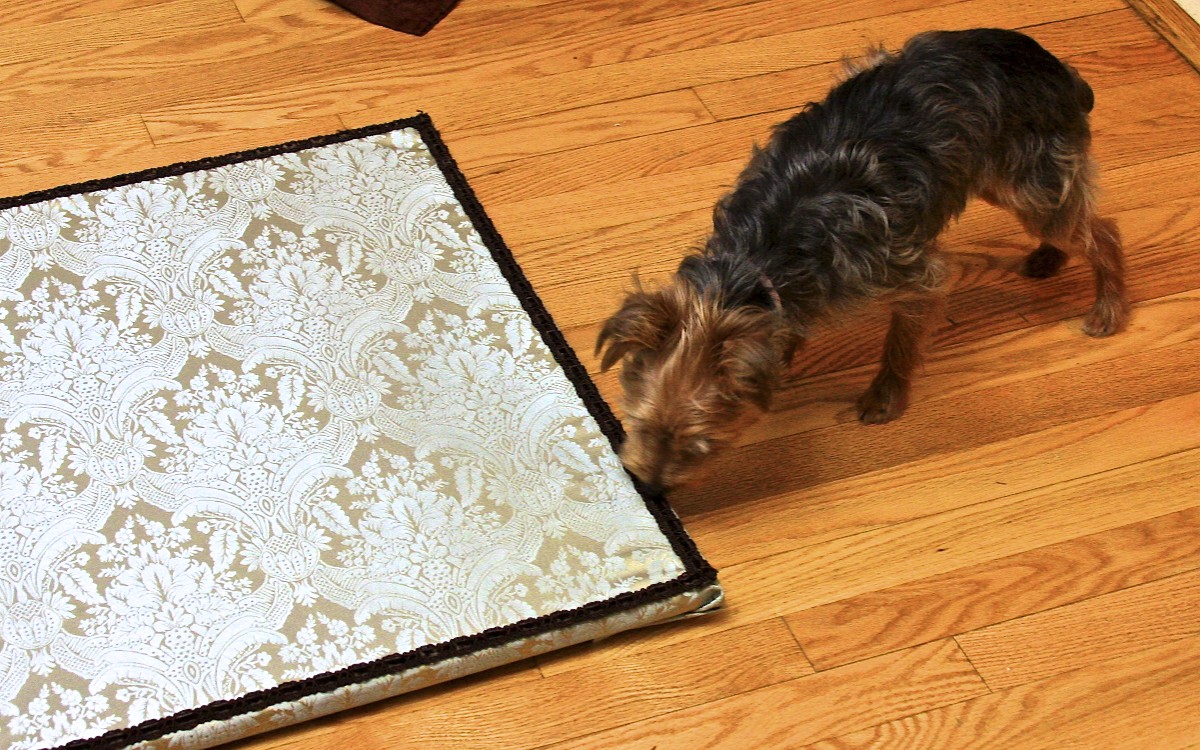
 The bulletin board pictured above had been on the wall of the Beadphoria, Inc. for quite awhile. It became one of those things that you see, but didn't look at every day. As you can see, it was in desperate need of a makeover.
Here are the materials we used:
-Bulletin Board
-Fabric Remnant
-Brown Velvet Ribbon
-Glue Gun & Glue Sticks
-Picture Hangers
The fabric was spread out onto the floor and the bulletin board placed in the middle.
Next, hot glue was put onto the frame on the back of the bulletin board to hold the fabric in place. From there, we flipped the bulletin board over. Using the glue gun, we tacked the brown ribbon in place around the edge of the frame.
 Of course the work had to be inspected by our quality control manager and customer service rep, Lola.
 We placed the bulletin board back on the wall, and started putting the picture hooks in.
 Close up of the picture hooks.
Only thing left was to add the jewelry!
 We now have a beautiful showcase for our jewelry with a little bit of spring cleaning effort!
GLOSSY ACCENTS IS FABTABULOUS

 |
|
![]()
Recycled Paper Beads
 In Victorian times, women in England gathered in dining rooms to make beads by rolling scraps of wallpaper on knitting needles. They would then string the beads on long pieces of yarn to create curtains that separated rooms. You can make these beads from recycled scrap paper, and string them together to make jewelry!
What you'll need:
- scraps of wallpaper, magazine pictures, used wrapping paper, colored paper, etc.
- pencil, ruler, and scissors
- paste
- drinking straws
- thread or yarn
Before you begin, gather all of your supplies together and put them on your work surface. Read all of the directions from start to finish. Now you are ready to begin.
- With your scissors, cut long triangles from your paper scraps that are about 1/2-inch wide and 2 1/2-inches long. Make a template to trace, if you wish.
- Cover one side of a triangle with paste. Put the paste on the inside of the paper so that the colorful pattern will be on the outside of your bead.
- Place the triangle's glued short side on a drinking straw.
- Wrap the paper completely around itself on the straw.
- Cut away the straw at both ends of the rolled paper.
- To make beads with different shapes, vary the size and shape of the paper triangles that you cut.
- Let your beads dry, and then string them together on your thread or yarn. Knot the ends of the thread together.
Adapted from Papercrafts Around the World, by Phyllis and Noel Fiarotta
(Sterlilng Publishing Co., Inc., New York)
Step 1 
 Step 3
Step 5 
 Step 6
How to cover a bead with peyote stitch
 | |
| This spectacular peyote stitch Bloomin' Bead was designed by Carol Dean Sharpe of Sand Fibers. |
Before I get completely off topic, let's talk about covering a bead with beadweaving to make a beaded bead. It's a fabulous way to turn ordinary wood beads into something spectacular, and these little peyote-stitch beading projects usually don't take a lot of time to finish.
To make your own peyote-stitch-covered beaded bead, you'll need the following tools and materials:
- Round wood beads. Start with round beads at first, since their shape makes it easy to shape peyote stitch around them. For this tutorial, I used a 20mm round wood bead that I found in an assortment from my local craft supply store.
- A small strip of double-sided tape, also available at your local craft supply store.
- 2 grams of Japanese cylinder beads, size 11o in color to match or contrast with your wood bead.
- 1 gram of size 15o seed beads in a color to match or contrast with your cylinder beads.
- Beading thread of your choice (6 lb Fireline recommended).
- Size 12 beading needle.
- Scissors or thread cutter.
- Additional beads for embellishment, if desired: fringe beads, drops, daggers, bugle beads, or larger seed beads.
Let's get started! Here's how to cover your wood bead with peyote stitch in ten easy steps:
A tip for maintaining even tension when working peyote stitch around this kind of beaded bead: when you pass through the first bead in Step 3, leave a thread tail that is approximately one-half the length of your beading thread. This way, you can flip the bead over and work peyote stitch on the other side of the bead without having to add a new thread!
Great Jewelry articles to help you start your beading business
A SWEET BEADED BOOKMARKER
Elvenwork Forum


Lavender and lace


It's Good To Be Queen

Sweet Dreams by Candle light

http://youtu.be/8iASs7koZZI
How to Make Broken China Jewelry -- powered by eHow.com

Pages


thank you, well done!
ReplyDeleteThanks you for this tutorial! It's easy to follow and very instructive, exactly what I was looking for
ReplyDeleteVery nice! Thanks!
ReplyDelete